Sunday, November 25, 2012

Create Your Classroom Fall Project

Good Morning Crafters!
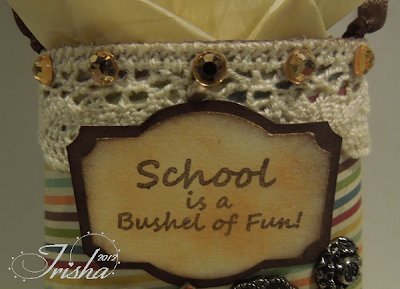
This will be my last post for Fall projects this year (I think).  I just love this little ornament.  And you might not guess what the base is on this little guy.  Take a look.
 
I actually started with a toilet paper tube.  My preference would be a paper towel tube but I had this one handy to make a quick project.  When I say quick, I mean quick.  Of course the first one you make of anything always takes longer but, when I duplicate this one with a Christmas/Winter theme I'm estimating it will only take about 30 minutes or less to make.  Did I say quick?  I love the way this project came together.   Here's a side view to see the dimension a little better.
To make this adorable ornament just wrap your designer paper around the tube and trim off the ends, don't fold to the inside.  The paper will behave better if you roll it a bit in your hands before gluing to your tube. You could measure your paper too but, that would take extra time and we're doing quick, right?  Although, I think you can get 4 of these out of one sheet of 12x12 paper.  I recommend you use strong tape or wet glue for most of the gluing on this project.  Sponge the edges of all your paper.
Next I added a paper ruffle with coordinating paper.  I scored the ruffle paper strip (about 1-1/4" wide) at 1/4" and 1/2" alternately, exercised the folds then crumbled it all up and sort of followed the folds I made.  I didn't want it to look "perfect".  I just made the scoring lines so the paper would be a little easier to manipulate when making the ruffles.  I glued the ruffle to the tube then stapled the tube shut on top of the ruffle.  I then added a  little strip of another paper for a border to hide the unevenness of the top of the ruffle and the staples.
I used Scor-tape instead of red sticky tape (it can be a bit forgiving unlike the red stuff) to attach the lace at the top.  Of course, all my seams are at the back.  I added this cute sentiment from Create Your Classroom "Back To School" stamp set and punched it out with a fun shaped punch (SU).  I cut the second layer by hand and attached the label with some foam tape at the bottom and more Scor-tape at the top over the lace.
The next step was to add some chipboard leaves which I inked up and made veins using my piercing tool.  I also added a couple of metal button brads (SU).  Next, I added the ribbon handle (started with about 12") by punching a hole in each side with my Big Bite hole punch then tied a knot and glued the loose ends down inside. I glued another coordinating paper to the inside of the tube to hide the loose ends of the ribbon and brad legs and inked the edges to give my project a more finished look.  Here's another close look
After all this is done, I added the bling (seriously, this word needs to be in the dictionary!) all around.  Bling is a bit like ribbon, you have to have a little on every project, right?  Of course you do, don't be ridiculous!  So, there you have it, my last Fall project for this year.  Stop back soon for more Christmas and Winter projects.  I can't wait to show you what I'm making!

I entered into theses challenges:
Hotshot Craft-#12-ends 11/29


Monday, November 19, 2012

Interactive Christmas Card

Hello Crafters!
I have another project here for the challenge over at Eclectic Ellapu.  I just couldn't decide which project to post over there.  So, this is my second project for challenge #6.
Doesn't  really  look  like  a  card  at  this  point.
Close  up  of  the  cuff.
The  cuff  lifts  up  to  reveal  a  message.

Pull  the  cuff  out  to  write  a  personal  message.
 I cut two of the stocking die-cut from Stampin' Up! then ran the main stocking piece through a Cuttlebug embossing folder.  I had to flip one of them over to get the embossing on both sides correctly.  Using my finger daubers, I inked up the stocking giving a little more ink to the raised images and, of course, I inked all the edges of all the pieces.  The tag insert was a bit of a trial and error to make it fit right and not have the stocking cuff be all wanky.  Once I figured that out then I glued the side and bottom edges only of the stocking, attached the toe and heel and, added faux stitching.  I stamped the sentiment and reindeer on the cuff and added bling all around.  I made a loop for hanging on the top left of the cuff  (front side only) and tied a bow for a little extra fluff.  So, this is not only a card (you could add a gift card inside) it could double as an ornament on your Christmas tree.  I might just have to make some more of these now that I have it figured out for some of the people on my Christmas list.  Give it a try, it's fun!

I entered into these challenges:
 Stampin For The Weekend-#21ends 11/21


Sunday, November 18, 2012

Eclectic Ellapu Challenge #6 - Layers/Interactive

Hello Crafters!
We have another challenge post for you over at Eclectic Ellapu from the Purple Team. The theme is layers/interactive projects.  I did a little of both with my card but I will be back soon with a second project (or maybe more).  This one is so much fun that I sure hope you will give it a try.

4x4 card base with Spellbinders DieCut layered on top
 Don't you just love all the sparkle.  I achieved this by using the champagne mist paint from Stampin' Up.
Lift up the little flap for your message...

And the inside has the rest of the message
I have another project for this challenge that I plan to post for you tomorrow so be sure to stop back by!  See you then!

I entered into these challenges:

Saturday, November 17, 2012

Bearly Mine Crafts Mega Candy Giveaway

Hi Crafters!
I ran across this giveaway at Bearly Mine Crafts and just had to share it with you.
If you would like a chance to win the blog candy pictured here click  on the link, follow the rules and link up for your chance to win.  All the info and pics of what you will win is all there for you to see.  This is a huge giveaway!  This is open to all world wide.  Now, if you are from the UK you can also enter to win an Epson printer!  The drawing closes on November 30th so there is only a few days left.  Good Luck!

Saturday, November 10, 2012

SYS Saturday

Yep! It's that time again. So start stirring your stash!

Well, I finally made it to Christmas mode.  That's not to say that I won't post a "Be Thankful" card before Thanksgiving gets here.  But, for today it's the joy of Christmas.
 I used to have a problem using non traditional colors for Christmas but, this year I seem to doing just that.  I didn't even use Christmas paper on this card.  Pretty unusual for me.  I do love this paper from Basic Grey though and it seemed to go well with the copper tones in my reindeer.  I was fortunate enough to have enough of this paper I could make 12 of the cards (and matching envelopes) and I got them all done in one day!  Only about 60 to go so, you'll be seeing quite a few more Christmas cards from me in the next few weeks.
Anyway, the pink ribbon I got for a steal at a sale somewhere.  I got about 100 yards of it in pink and blue for about $.50 each.  I have shared so much of it yet, I still have a ton!  The lace was from another crafty yard sale from a couple of years ago.  The glittered reindeer I got at Wal-mart last year in the Christmas ornament section.  Yep, it's supposed to be hanging on your tree (I have a few more ornament surprises for you coming soon)! The minute I saw it I knew I had to put it on a card.  Alas, last year I didn't get it done so, it's one of the first Christmas cards for this year.  He is attached with some mini glue dots. When I had the card all done, I sprayed it with Stampin' Up's Champagne Mist.  I just love the subtle sparkle it adds.  I did add a little bling - 3 on the ribbon and 1 for the reindeer's eye to add a little more dimension.
What did you buy last year that you stashed? You know you want to look so, go stir your stash and see!

I entered in these challenges:


Have a great week and be sure to check out the Eclectic's Pink team challenge tomorrow!

Thursday, November 8, 2012

Pink Christmas?

Hello Again!
Due to being ill last week(end) I have some catching up to do so I have a second post for today due to some deadlines of the challenges I have entered below.

I got my  idea for today's project from Susie Wood, Stampin' Up Demonstrator (see her blog here), at a workshop I did with her recently.  She's a great hostess so if you are ever in the area you should look her up! Here is her project:
She used crumb cake card stock and some Christmas designer paper for her bag and topper then added the cute sentiment to the front with some pop ups.  Very cute.

So I was inspired to make my project for stamp club last week. I changed the image from what we did at club but, other than that it's the same.

I used a regular lunch sack and cut about 4 inches off the top.  I inked up my lace to give it a vintage feel and ran ribbon through the holes in the lace.  I attached this to the top edge of the bag (topper-the part I cut off) with score tape (I find this much easier to use than the red sticky tape).  Using my Big Bite hole punch I punched through the bag, ribbon and lace of the topper and tied the top of the topper shut with another piece of ribbon.  I used a die cut doily (only half) - Sizzix - I received from a friend on the right side and a journaling tag (again only half) on the left side of the topper.  I stamped the Patterned Pines image - Stampin' Up - twice on cream card stock cutting out one set and popping them up with foam tape and layered that on basic gray card stock - Stampin' Up.  I made the tag with another image from the Patterned Pines set and added the to & from with another set (clearly stamps).  To make the flagged ends I just layered some basic gray card stock behind the cream then used a square punch (turned side ways). I popped this up over the corner of the other image.  To reinforce the bag itself, I added a 4-1/4" x 11" piece of basic gray card stock and a one inch strip of pink card stock - Stampin' Up - for a design element.  I inked up around all the edges of the parts and sprayed the image and greeting tag with Stampin' Up's Champagne Mist and of course added plenty of bling.  Now, just slip the topper over the bag and there you have it, a beautiful handmade gift bag.  You should give this a try, it's so much fun.  The topper is about the size of a card if you use a lunch sack so it's easy.  Use your card stock or any size bag you like for your own creation and make it as simple or as complex in decorating as you like. Just have fun!

I entered into the following challenges:
Ooh La La 11/11

Thanks for stopping by today!

Pink, Pearls, Polka Dots, & Lace for the Girlies!


Hi Crafters!
Today's card may look a little familiar to you.  I did one very similar for the Eclectic's #3 challenge here.  The patterned papers stayed the same as before but, I changed the layout a bit and by adding some pearls I have a totally new card using mostly the same products.   Do you ever do that?  When we have stamp club it can become a free for all in design.  You know, show what yours looks like, give them the parts to make it and let them do their thing.  It's fun to see what everyone comes up with.  I really like the way I polka-dotted the diamond glaze to enhance the bubbles in the tub.  Such a girlie card.  Makes me want to go take a soak and cherish the moment.  lol!

I will be entering the following challenges:


Saturday, November 3, 2012

Eclectic Ellapu Challenge #4 - It's a Vintage Thing

Hello Crafters!
It's time again for another challenge from the Purple Team at Eclectic Ellapu.  This time around our theme is "It's A Vintage Thing".  Get on over there tomorrow (Sunday) and check out the rest of the Purple DT inspirations and get to craftin'!  You have until Saturday to post your links (to your blog post not your blog).  Good luck everyone!  For my inspiration I decided to do this pop up easel card.

I have entered into the following challenges:
 Have a great week!