Sunday, March 24, 2013

Eclectic Ellapu Challenge #22 - Whimsical

Hello Crafters!
We have started a new challenge at Eclectic Ellapu and Berni is our hostess this week. Berni's birthday is April 1st so she has asked us to create something funny and/or whimsical for this weeks challenge. The inspiration from the Pink Team is great. So be sure to check out and join in the fun.

So, here's my card this week.
I have always loved this set from Stampin' Up. I used a a leafy embossing folder on the bashful blue card stock for depth, die cut the leaves (SU) from certainly celery card stock and inked them up a bit. The card is also inked up around the edges. I added the two tone ribbon (Michael's) to anchor the leaves. The image is colored with pencils, cut out with a nestabillities die and inked with yellow then just a bit of orange for more depth. The sentiment was stamped and cut in to separate pieces which were also inked with yellow and orange. The image and sentiment were both popped up with foam tape. The card was then layered onto so saffron card stock and inked up along the edges.

Thanks for for stopping by today and I hope you will join in the challenge this week  with the Eclectics. I for one can't wait to see the cards everyone creates.

Happy Crafting!

Monday, March 18, 2013

Artistic Inspirations Challenge #33 - Use Metal

Hello Crafters!
Time for the new challenge at Artistic Inspirations. This week we were asked to use metal on our projects. Our sponsor is:
I chose a motorcycle image as I have had a layout I've wanted to use for a long time using metal. Here's my card.
I used foil for the metal background that I ran through an embossing folder then adhered to white card stock.  Then I pierced around the edges. I also inked the edges of the white card stock. I used 2 circle punches to make the washer above (a real one would make this too heavy to mail) and attached with a slip knot to the black cording and wrapped around my card card stock. I layered all of that on to black card stock. The image was colored with Spectrum markers and the edges were inked in black. The image is popped up on pierced foil and black card stock then all of that is popped up again on top of the embossed foil piece. I added 3 small pieces of metal I found in my hubby's hardware chest. On the inside, even though I didn't take a picture of it I added 3 more very small washers on white card stock to add a little interest there.
I hope you have enjoyed my card today and will stop by Artistic Inspirations and take a look at the rest of the DT's projects, they are all inspiring. Don't forget to upload your project in to the challenge!

Happy Crafting!


Sunday, March 17, 2013

Eclectic Ellapu Challenge #21 - Baby

Hello Crafters!
It's Sunday again and all be it late, I have the new challenge for you from Eclectic Ellapu. It was Elisa's turn to pick our challenge and she has chosen a "Baby" or "Pregnacy" theme this week. So get all your baby stamps and embellishments out and join the fun.
For my project this week I have a cute 6x6 album to put all those great baby pictures.
The basic style of this album is not a new one, but I have added some pages that flip and some places to slip in a tag for some extra journaling. Below are pics showing how I put this album together.


Happy Crafting!

Thursday, March 14, 2013

DT Call at FAT-TASTIC TUESDAY

DESIGN TEAM CALL!
There's a new blog on the block called Fat-Tastic Tuesday. I have teamed up with  Abbie and we are having a Design Team Call! Here's a little info about the call from the new blog.

Calling all paper crafters!
Are you an experienced paper crafter? Do you like to make cards and/or mini books? Do you like digital images? Do you have an active blog? Do you like to socialize with like minded crafters? Then our Design Team is the team for you. We are looking for a talented team of paper crafters to help promote fat pages and make them the most popular thing on the planet since sliced bread!  Prior design team experience is not required. 

For more detailed info click on the link above. We hope to see you there!


Monday, March 11, 2013

Artistic Inspirations Challenge #32 - Anything Goes

Hello Crafters!
Challenge # 32 goes live today at Artistic Inspirations. We have another all time favorite theme of "Anything Goes". Our sponsor this week is:
Eureka
I chose to use the image called "Hibiscus with Bee" for my card and do like how it turned out. I also decided to do another 4x4 card. They really are fun to make.

I have colored the image with Spectrum Markers then cut out. I did trim some of the leaves off to fit the card without looking like I chopped them off the edge. My card base is Going Gray card stock from SU.  I added a 1-1/4" strip of black card stock on the left to anchor everything. The lattice die-cut (SU) is used behind my image to represent a trellis. Yellow ribbon is woven through the cut out areas of the flower image and wrapped around the card then tied in a bow on the front. The image is popped up at some of the top areas only. See below:

If I were to do this card again, I would probably cut the image twice and layer the flower and the bee a second time with foam tape. All in all, it still looks decent. "Delightful" is from a Fiskars clear stamp set I picked up at Joan Fabrics. Lots of sentiments in that set. I popped the sentiment up and the red back layer of the sentiment to add a little more dimension to my card.
You can see all the dimension on the card at this angle.

Do head over to Artistic Inspirations this week and join in our "Anything Goes" challenge. We would love to see you play along. If you haven't already done so, be sure to click on the links on my blog here to get the new address.
Happy crafting!


Sunday, March 10, 2013

Eclectic Ellapu Challenge #20 - Birthday

Hello Crafters!
Today begins a new challenge at Eclectic Ellapu. Nana Connie is our hostess this week and she has picked one of everyone's favorite themes. Yep, it's birthday time. Now Nana Connie chose this theme because her birthday is on the 17th - St. Patrick's Day. So be sure to stop by and leave some birthday wishes for her.

Ok, on with my card. I recently went to a stamp class and made a card with a really neat layout. Miss Susie is an awesome instructor and comes up with all kinds of new ideas. My card today is exactly like hers with my own supplies. Her card his here, my card is below.


I used an owl digital image I won from Dillybeans. Isn't it just the cutest? I colored with my Spectrum markers (of course) and added googly eyes from my stash. Couldn't help myself on that one. I layered it on Pink Passion (pierced the corners), white, then Green Galore card stock form SU. The card base is 4-1/4 x 5-1/2. The top portion that has been trimmed is 3" wide (so I trimmed 1-1/4" off). I layered with scallop designer paper from Kaiser Kraft (2-3/4" x 5-1/4") and added some dashes with my Basic Black marker (SU) to bring the background forward a bit. I used a 5" piece of organdy polka-dot ribbon and tied in a loose knot for the bow. I stamped the "happy birthday" from a Paper Studio's clear stamp set and popped that up on to black card stock. Here's the fun part. I added a sentiment to the inside that fit the image.
Nana Connie, this is in no way directed toward you sweetie! I knew I wanted to use that sentiment when I got that image.

You can see now how I attached the layered image piece on the front. Place the white card stock with the sentiment on the inside so it hides under the front image. Again I added the faux stitching and some punched flowers to add a little interest.

I hope you have enjoyed my card today and will want to give it try. Also be sure to stop by and see the inspiration from the Eclelctics' Pink Team and join in the birthday challenge.
Happy crafting!

Monday, March 4, 2013

Artistic Inspiration Challenge #31-Things With Wings

Hello Crafters!
We have a great challenge at Artistic Inspirations this week. Things with wings has a wide open palate, don't you think? Our sponsor this week is:
They have some fabulous designs over there. Be sure to stop by and take a peek.  
Now for my card. I chose another special fold this week. Here's the front with the image "Lasy Susan Buggies"
Did I say I love my new Spectrum markers? Sorry, I know I have, I just can't say it enough. I backed the image with Elegant Eggplant designer paper from SU then layered onto Summer Sun and Garden Green card stock both from SU. The card base is 4" x 5-1/4" and backed with white card stock (can't see the white backing too well here).  Before adding all the pretty layers, I scored the card front at 4" up from the bottom corner to the bottom of the opposite corner. The picture below will show better. This is the back of the inside of the card in the folded up position with the image layers attached.
 Then I added the polka-dot ribbon at the top of the card above where the score line starts. As you can see below, when the card is folded the ribbon sits pretty right next to my image. Gotta love that. Here's a couple of other angles to look at.
 

So I added the sentiment on a punched label (SU) and layered onto Elegant Eggplant card stock (SU). Then, I added some little bits of bling flowers to pretty it up. Oh, the buttons on the flower centers are from my stash. Funny thing is, I only had one black cloth covered button. So, I used my sharpie to color a peach colored button black. Oh yeah, I got skills. Lol! Those sharpies can sure come in handy!

Well, I hope you like my card today and I hope you will stop over and see my other teamie's cards at Artistic Inspirations. They are truly beautiful, every one of them. Hopefully you are inspired to play along with our challenge this week.  Make sure you get the new address over there by clicking on my links here.

Happy Crafting!


Sunday, March 3, 2013

Eclectic Ellapu Challenge #19 Something for a Child

Hello Crafters!
It's time for another post for our Purple Team at Eclectic Ellpau. I am a day behind getting this posted as I wanted to make sure I had the tutorial written well. Our theme this week  "Create Something for a Child" is hosted by Madeleen. I hope you will go over and check out the rest of the teams projects. I feel so fortunate to be a part of such a great group of ladies! So, here's my project:
front view closed
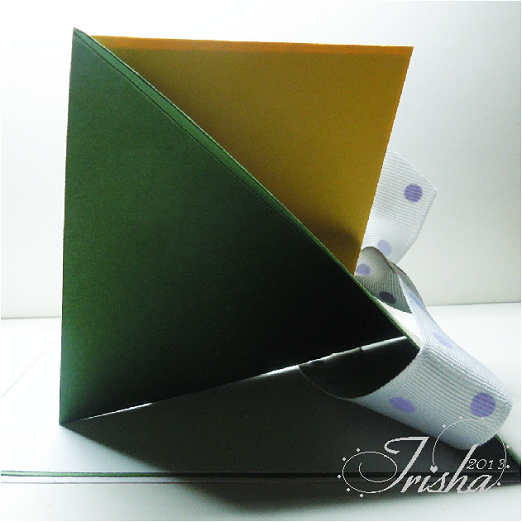
front view beginning to open
front view opened-sentiment teaser
back of card-riddle solved
I decided not to make a traditional birthday or congratulations card and went to the funny side this week. We have all had children in our families not feeling well that just need a little laugh and that's how my project was born. Since I have boys, the alligator (SU-Animal Valentines) seemed to appeal to me. I stamped the background with a stamp from "Fun Faces" (SU). I also added ha!ha!'s with my marker to fill in a bit. Below is the pattern, supplies, measurements, and directions for you to make this card. Don't be intimidated by the length of the post. It's easier than you may think. I haven't done one of these cards for at least a couple of years and pretty much did it by memory. So, I know you can do it!

Supplies:
Base card stock (1) 9-1/2" x 6-1/4" (I used Summer Sun)
Accent card stock (2) 2-3/4" x 4-1/4" for inside panels (I used Garden Green)
White card stock for sliders (2) 2-1/4"x 4"
Image card stock backing (this will vary according to your image)
Stamps or Digi images including sentiments
Designer paper (1) 2"x 6-1/4" (SU)
1-3/4" square punch,
1-1/2" circle punch
Word window punch (SU)
Label punch (SU)
Ink & Marker (SU-Wild Wasabi)
Twine-about 18" if  you want a bow
Plastic shopping bag (strip 1-1/2"x13")
Score tape (or red line tape)
SU Dimensionals or foam tape
Other adhesive

Directions:(not as hard as it looks!)
Decorate, stamp, use your digi's or whatever to decorate the inner image/sentiment panels (the white layer) and prepare the outside images. Layer the inside panel images/sentiments (white card stock) on the green layers of card stock. The top image will be layered at the top of it's panel while the bottom image will be layered at the bottom of it's panel, set aside.


Score your card base at 3", 6", and 9" as shown above. When punching the holes for panels 1 and 3, only go about half way in on the punch and punch out. Mark with a pencil if you don't have a 1-3/4" square punch and punch twice. Go a little less than half way on the circle punch. You just need enough to grab the panel and pull. The notches on the sides of your punches will help you line them up straight.

Wrap your plastic strip around panel 1 at the cut outs (the square end ) -see below - not too tight, you want it to move freely. Glue the ends of the plastic strip together (do not glue to card!) with score tape (you need the extra support here) trimming off the extra plastic, you don't want that hanging you up. You should not have any glue showing. Your mechanism will not work if you do. Make sure the strip will move freely up and down. If it seems a little snug you may be able to tug just a bit on the plastic to stretch it. Be careful. This is your mechanism. You will be gluing your inner panels to the front and back of this strip.

add plastic strip to panel 1

fold panel 1 from left to right over panel 2
 Do a temporary fold of your card base (second image above), folding panel 1 from left to right (square cut-out). Now fold over panel 3 from right to left (half circle cut-out). Slide your upper inner image/sentiment panel in on top of the plastic strip (this is between panel 3 and panel 1) inner image/sentiment panel right side up. Push/pull your inner image panel in/out to a point where you can see all of your image/sentiment above the top of your card, but no more than that. Open panel three carefully. Mark with pen on the plastic strip at the bottom of your inner image/sentiment panel on the plastic, remove image/sentiment panel and set aside. Using score tape, put a small piece of tape on the plastic strip between the marked line and the top of the plastic strip making sure not to go past the plastic or below the marked line. This will hold your image/sentiment panel in place. Attach your upper inner image/sentiment panel to the plastic strip with the bottom at the marked line making sure all score tape is covered.

  You will do the bottom panel in a similar way except that you need to put the lower image panel between panel 1 and 2 image/sentiment side up. Before you mark the plastic, the upper inner panel should be pulled out to the "open" position. Don't forget to fold over panel 3 to make sure your lower image/sentiment will show past the half circle cut out when in the "open" position. Mark your plastic strip.  Again, using score tape, put a piece of tape between the marked line and the bottom of the plastic strip not going past the plastic strip or above the marked line. See image above.


Almost done. Add score tape at the fold line of the flap as shown above. Do not remove baking yet. I prefer to cover the entire flap on this side for security. As before make sure you have no excess glue showing or your card won't work like it should. You will attach this flap to panel 1 under the upper sliding image/sentiment panel. That is really the trickiest part of this card. You may have to fiddle with it a bit and practice pulling on the image panels before removing your tape baking. In fact, I highly recommend it. Then, glue the flap in place.

Assuming your card is in working order, you can now finish decorating the outside. Use your normal adhesive at this point. Glue the designer paper strip to your card base with the seam at the front so it will be covered by your outer image and embellishments. Add some ribbon and voila! You did it!

TIP: I usually like to make myself a white card stock pattern before trying a new card fold to work out all the kinks before moving on to my good card stock. Please, let me know if you have any questions what so ever on how to make this card. I would be happy to help you.

Now get on over to Eclectic Ellapu and join in our challenge!
Happy crafting!

Saturday, March 2, 2013

SYS Saturday 2nd post - Silhouette tip

Hello Crafters!
Well, I did it! If you read my earlier post today then you know what I am talking about. The short version, if you missed it, is I found a really great tip on the Silhouette blog that I shared and wanted to try. I tried it and I love this wonderful tip. So again, I will share it with you. But first, my card.


Ok, so here's what I did, good and bad. The good: I found plenty of scraps to choose from. So, I cut my scraps into 2" squares and attached to my Silhouette mat. I chose the images, and sized them as instructed then cut them out. I used the present image here for a simple birthday card. The bad: I learned that intricate designs have too many small pieces to cut and won't pop out well. Simple designs work best. You will want to make sure your scraps are all the same weight paper as well.
Here's a couple of the other designs I cut and the negative of one.


Now go give this a try. You know you want to so get going. You're going to love it!
Happy crafting!

SYS Saturday

Hello Crafters!
I think I missed my SYS post last month. But I'm back with another one for you and will plan on the first Saturday of each month being SYS Saturday going forward. Having it in the middle of the month was throwing me off. Yeah, I might be a little ADD.

So, I will post twice today. First, I just want to give you a link to check out.

I was surfing a bit, catching up on some blog reading and saw the above post on the Silhouette blog. I was totally in love with the idea posted that I had to share it with you for my SYS post. Now, you Cricut users can probably adjust the idea to work for you as well. If anyone does figure that out, leave me a comment with a link to your post. I would love share what you did and how you did it.

Basically the idea is to cut your scraps down to fill a 12x12 (if you have a newer machine) or an 8-1/2 x 11 cutting mat. Best if all the scraps are the same size I think. Anyway, feed the mat with your scraps into your machine, pick the objects you want to cut out, size them to your scraps, align, and cut. What an awesome way to use up some scrap stash! And why not use the negative on a card too?

Ok, I am off to shower then in to my craft room. I hope you will give it a try. Don't forget to leave me a comment with a link so we can all check out what you did with your scraps.
Happy crafting!